Wow little did I know after my last post it would be almost a week before I finished the quilt I was working on!!! I have missed blogging so very much this past week. That's a good thing right?!?! :)
We went out of town over the weekend to visit family and had a wonderful trip. I enjoyed visiting and seeing my niece and nephews. They are all three growing so fast, especially my nephew who was born in May. He is a sweet little boy and flying through all the milestones of the first year! I am so thankful that even though we don't live in the same town as the rest of our family we are still close enough to go visit them. I could not imagine not seeing them grow up!
I have had several people ask both here and elsewhere both how to put a quilt together and how "I" put my quilts together. Part of my length between my last post and this one was taking pictures each step of the way with the intention of putting them together here. Keep in mind everyone has a different way of going about things and this is the way that works best for me. If you find a way that is easier for you by all means there are no "rules" to follow as long as your quilt holds up well that is all that matters :)
First things first.... measure your finished quilt top to figure out how big of a backing you need. You want to make sure that your backing fabric is 4-6 inches larger all the way around than your top. This is so that when the quilt is being quilted and pulls a bit you don't have your backing fabric smaller in the back than the front. Your backing fabric will often have to be pieced together to make a large enough solid piece of fabric for the back. There is a sense of anything goes on backing now. I have seen backs that are pieced with all different colors, scraps and sometimes what looks like another quilt! So whatever you would like to use on the back will work. The only thing I would keep in mind is that the more seams you have on your backing fabric the harder it may be for quilting running over multiple seams that you can't see from the front.
 After assembling your backing fabric and pressing lay this out on a smooth hard surface. My choice location is the floor in my family room.
 I use painters tape which is not a really sticky tape to tape down the corners first very lightly pulling the backing smooth but not pulling enough to distort the fabric shape. I also tape down the sides in a few places as well to help hold it smooth. You want to have a completely smooth surface with no wrinkles.
 You can see in this close up how I tape it on the edges and corner and how it helps keep it very smooth.
 When I am sure the backing is completely smooth and secure I spread my batting out over the backing. I center it over the backing the best I can. Starting in the center of the batting I gently smooth my hands over the batting working from the center outward removing all of the wrinkles in the batting. When I have completely worked out all wrinkles and have a smooth surface I am ready for my quilt top.
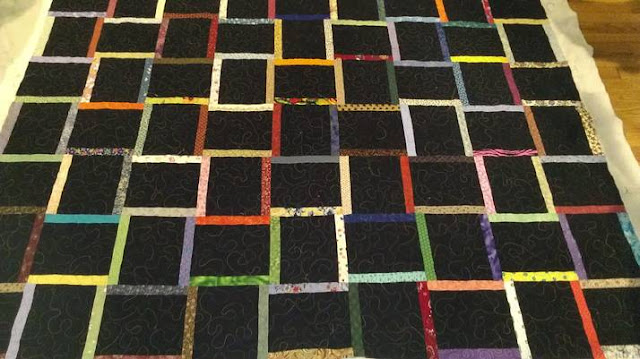
 I lay my top centered on the backing and batting and smooth the same way I smoothed out the backing. Starting in the center and making sure there are no wrinkles. This is very important so that in the end after quilting you haven't quilted in any wrinkles.
 Starting in the center of the quilt I use safety pins and pinning carefully through the back I pin the quilt every six inches or so. For this quilt I pinned at every colored fabric intersection and around the edges at every place the colors intersected as well. These are the pins I use and the label as a size reference. Some people do not like to use pins, they prefer to hand baste which are really large stitches in a grid fashion across their quilt that they remove later after quilting. I prefer pins. Some words of caution on using pins. Use high quality very sharp pins, dull pins will actually break the threads as they are forced into the fabric verses good sharp pins that pierce through the fabric. Make sure there is absolutely no rust in or on your pins. Do not pin a quilt that you do not plan on quilting right away. Any rust that develops on the pins will transfer onto your quilt and potentially stain and ruin your quilt with rust marks. After basting you are ready to quilt by either machine or hand.
 I am very new at machine quilting and will not be instructing on quilting in this tutorial. I have a quilters blogger button on the right side of my page with vast amounts of information found on these blogging websites. The site I use as my "go to" on quilting and designs with vast amounts of tutorials and videos on quilting is The Free Motion Quilting Project.
After pinning or basting you are ready to quilt!
 On this quilt I decided to put my quilt tag into the corner of the
quilt. I have never done this before and liked the results. For this type of quilt tag it needs to be done before
the binding is sewn on. The stitching that holds the binding on the quilt also holds the tag in the corner. If anyone is interested I would be happy to do a tutorial on putting on a quilt tag in the corner.
On this quilt I decided to put my quilt tag into the corner of the
quilt. I have never done this before and liked the results. For this type of quilt tag it needs to be done before
the binding is sewn on. The stitching that holds the binding on the quilt also holds the tag in the corner. If anyone is interested I would be happy to do a tutorial on putting on a quilt tag in the corner.
 After your quilt is quilted it is time to attach the binding. I cut my binding strips at two and a half inches. I feel like this is a good size and like the finished look. I like to attach my binding to the raw edge of the quilt top by machine. After attaching the binding I use my ruler and rotary cutter to cut off any extra batting and backing and straighten the edges of the quilt.
 Now I turn the finished edge of the binding under the to the back of the quilt and hand stitch this down to the backing using a hidden stitch. I use straight pins to help hold down the binding and keep it straight while sewing.
 After you have finished sewing down your binding you are done! Congratulations!!!
I have decided to wash all of my quilts after finishing them before giving them to the recipient. Quilts can get rather dusty while sewing and quilting them and I just feel like washing them gives them a thorough cleaning before they are given so they are nice and fresh and ready to be used.
 Here it is!!! Freshly washed and ready to give to my friend for her birthday :) Whew... with three days to spare!
We went out of town over the weekend to visit family and had a wonderful trip. I enjoyed visiting and seeing my niece and nephews. They are all three growing so fast, especially my nephew who was born in May. He is a sweet little boy and flying through all the milestones of the first year! I am so thankful that even though we don't live in the same town as the rest of our family we are still close enough to go visit them. I could not imagine not seeing them grow up!
I have had several people ask both here and elsewhere both how to put a quilt together and how "I" put my quilts together. Part of my length between my last post and this one was taking pictures each step of the way with the intention of putting them together here. Keep in mind everyone has a different way of going about things and this is the way that works best for me. If you find a way that is easier for you by all means there are no "rules" to follow as long as your quilt holds up well that is all that matters :)
First things first.... measure your finished quilt top to figure out how big of a backing you need. You want to make sure that your backing fabric is 4-6 inches larger all the way around than your top. This is so that when the quilt is being quilted and pulls a bit you don't have your backing fabric smaller in the back than the front. Your backing fabric will often have to be pieced together to make a large enough solid piece of fabric for the back. There is a sense of anything goes on backing now. I have seen backs that are pieced with all different colors, scraps and sometimes what looks like another quilt! So whatever you would like to use on the back will work. The only thing I would keep in mind is that the more seams you have on your backing fabric the harder it may be for quilting running over multiple seams that you can't see from the front.


After pinning or basting you are ready to quilt!


I have decided to wash all of my quilts after finishing them before giving them to the recipient. Quilts can get rather dusty while sewing and quilting them and I just feel like washing them gives them a thorough cleaning before they are given so they are nice and fresh and ready to be used.

No comments:
Post a Comment